Tags are used in the GL Strings dashboard to categorize a set of strings. Tags can be added via an integration, manually, or during the screenshot upload process. They can be associated with and used to track things such as features, screens, components, JIRA-related issues, or to help simply sort IDs. You can assign multiple tags to a single string.
Tags are associated with IDs within a project across languages. Tags can also be grouped together under tag categories. Tag categories are project-specific and can be used to easily differentiate between tags and to track things like platforms, releases, and workflows (e.g. design review, development review, etc.). The GL Strings dashboard is pre-populated with some platform-related categories: iOS, Android, Web, and Jira. Tag categories can be created and managed on the Project Settings page.
Table of Contents
- Tag How-Tos
- Tag Considerations
Tag How-Tos
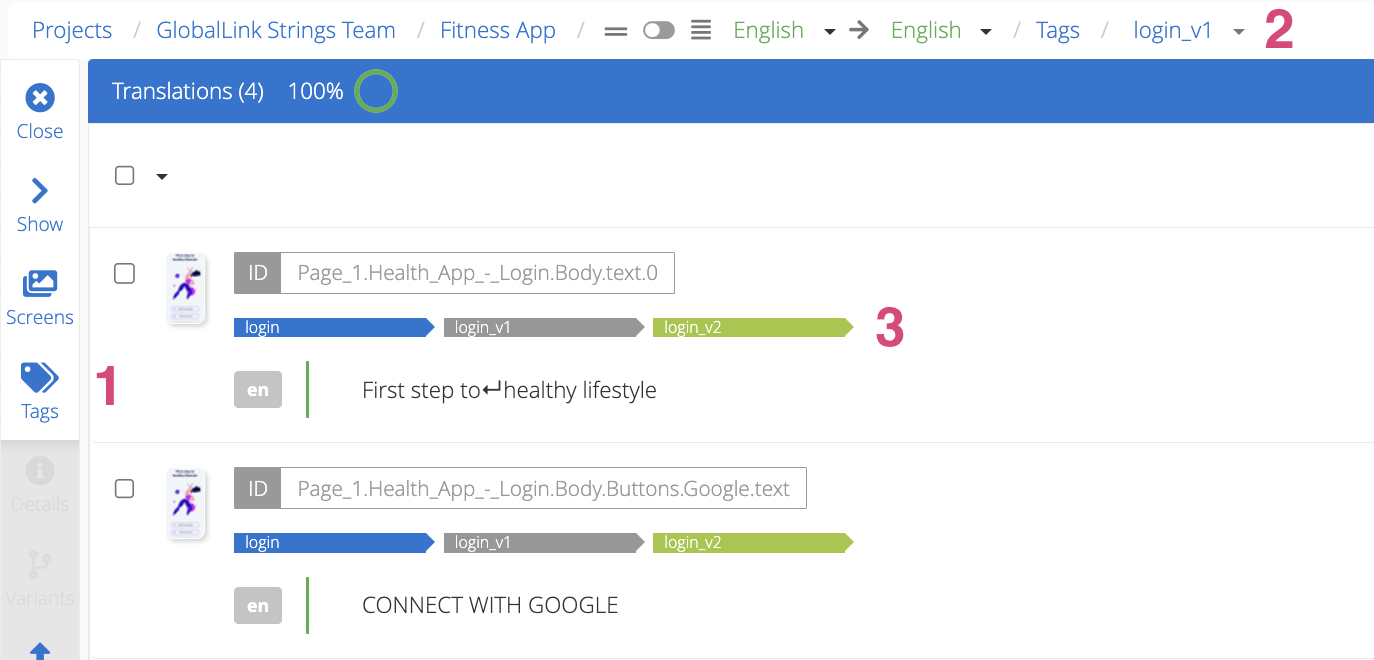
- GL Strings tags can be accessed via the Tags button in the side-bar menu of the Editor (1).
- If a tag is already selected, use the breadcrumbs to switch to another tag (2).
- Click on the tag itself under a tagged string (3).
Back to Top
-
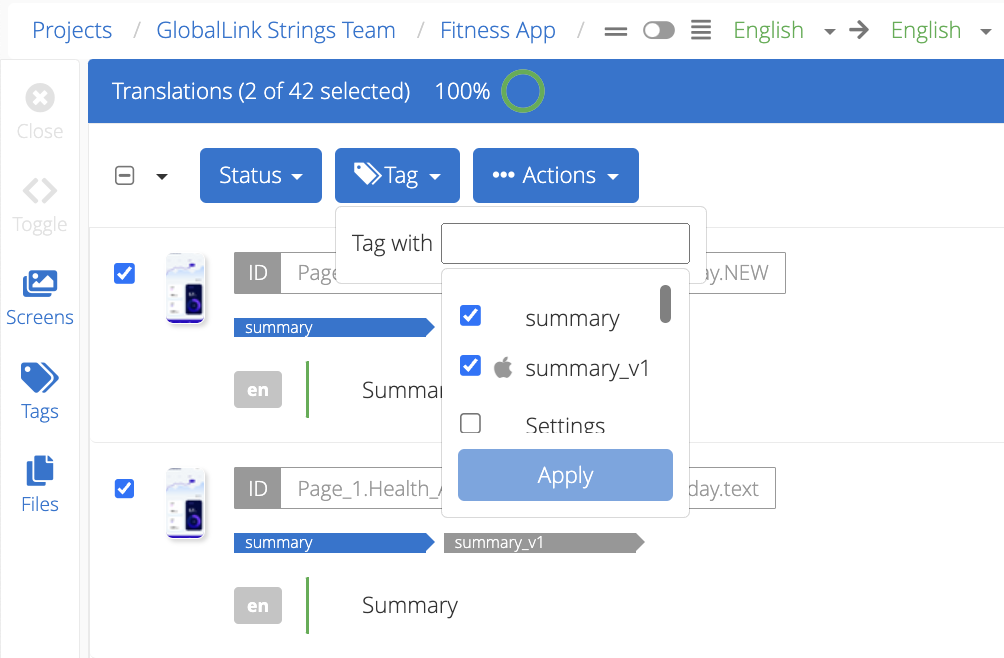
In the Editor
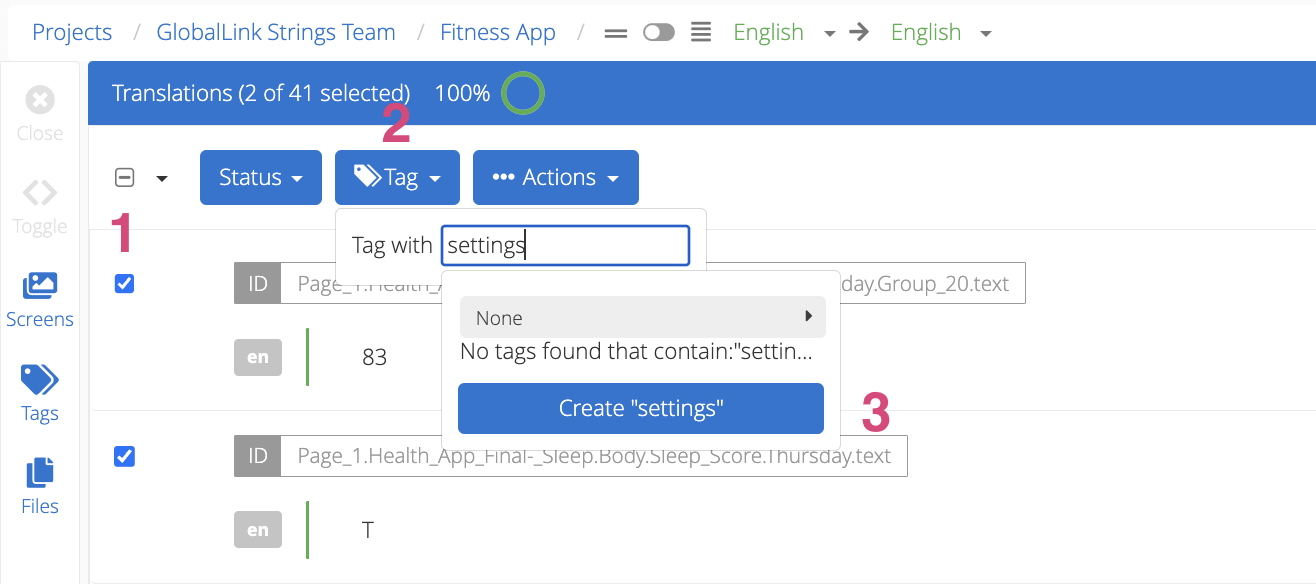
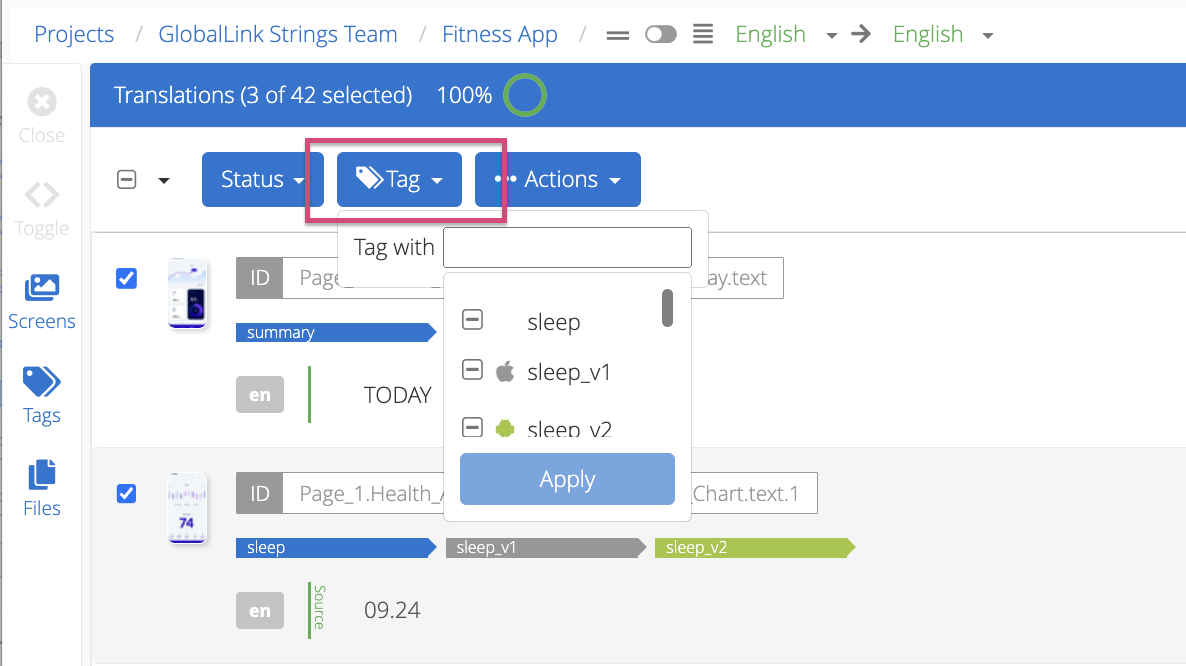
- Mark the checkbox(es) for the string(s) which needs tagging (1).
- Click the Tag dropdown on the top menu (2).
- To apply an existing tag:
- Type the tag name into the text field or scroll to search.
- Mark the tag's checkbox.
- To create a new tag:
- Type the new tag name into the text field.
Optional: Click the arrow button above "No tags found" to apply a category to a tag.
- Click Create (3).
- Click Apply.
-
During file import
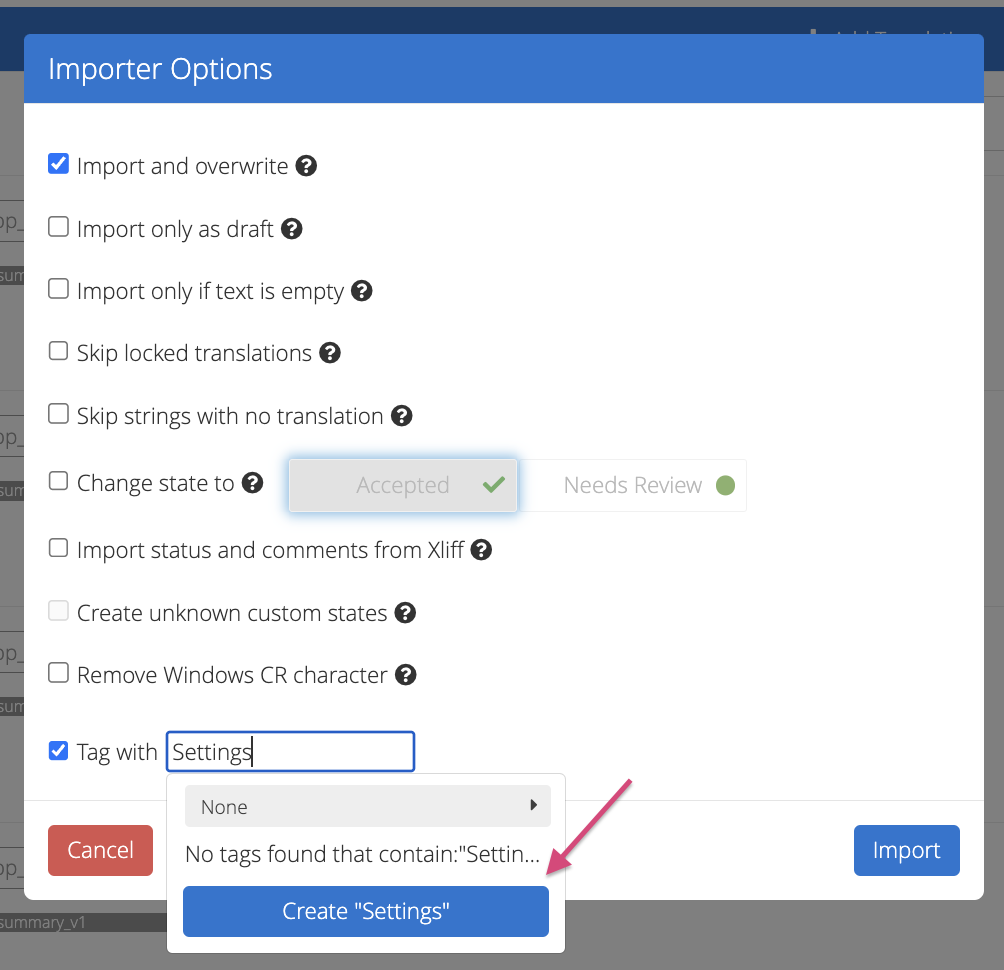
- Click Import on the project page or in the Editor and select the file.
- In the Import Options dialog, mark the Tag with checkbox.
- To apply an existing tag:
- Type the tag name into the text field or scroll to search.
- Mark the tag's checkbox.
- To create a new tag:
- Type the new tag name into the text field.
Optional: Click the arrow button above "No tags found" to apply a category to a tag.
- Click Create.
- Click Apply.
-
Cloning strings
📝 Note: Tags selected or created during cloning will only be applied to the cloned string.
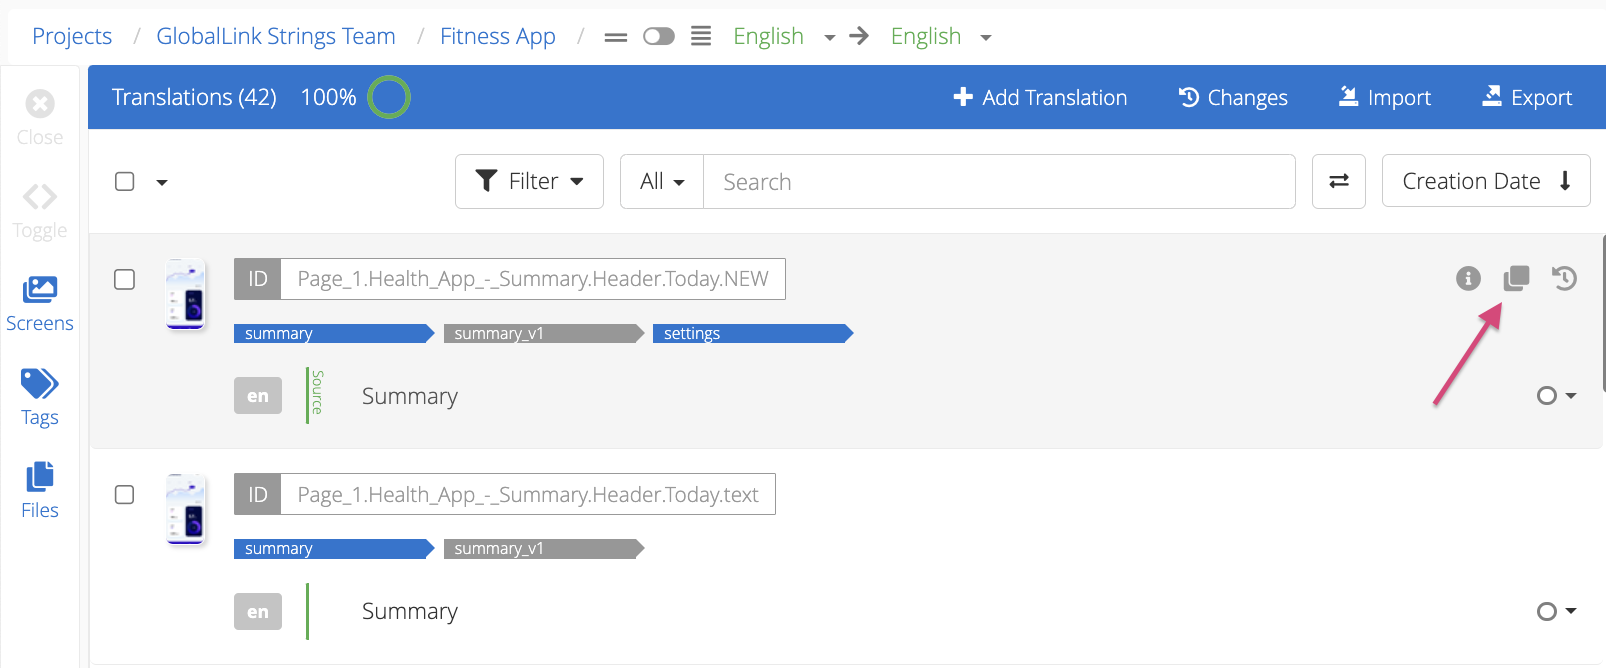
- Hover over the string and click the cloning icon.
- In the Clone String dialog, click into the Tags for Cloned ID text field.
- To apply an existing tag:
- Type the tag name into the text field or scroll to search.
- Mark the tag's checkbox.
- To create a new tag:
- Type the new tag name into the text field.
Optional: Click the arrow button above "No tags found" to apply a category to a tag.
- Click Create.
- Click Apply.
- Click Clone.

-
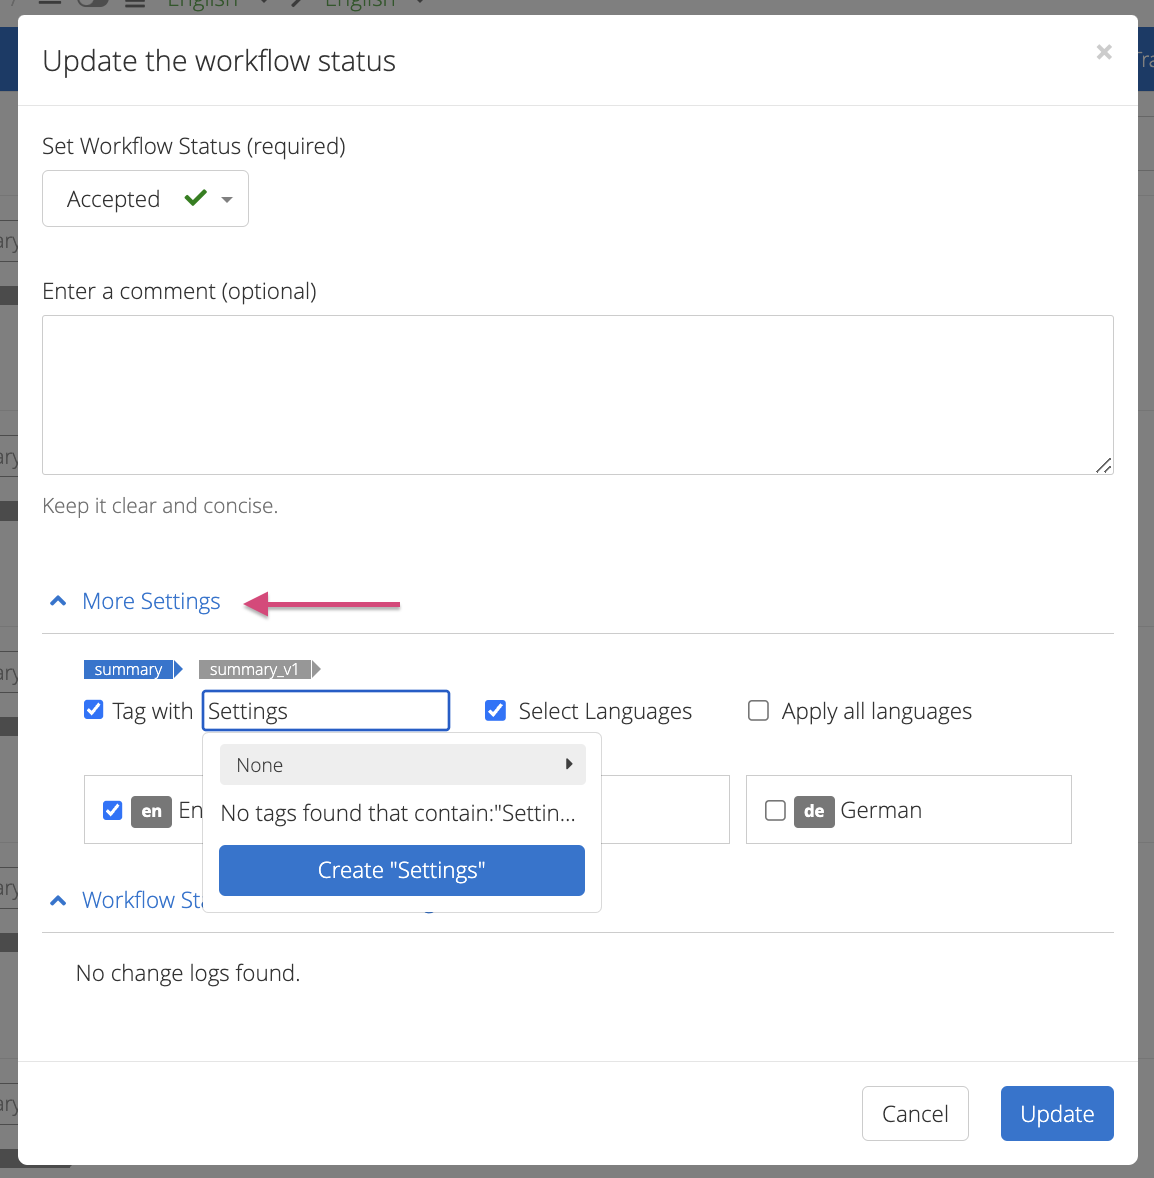
Updating the workflow status
- In the Update the workflow status dialog, select the new status for a string.
- Click to expand More Settings.
- Mark the Tag with checkbox.
- To apply an existing tag:
- Type the tag name into the text field or scroll to search.
- Mark the tag's checkbox.
- To create a new tag:
- Type the new tag name into the text field.
Optional: Click the arrow button above "No tags found" to apply a category to a tag.
- Click Create.
- Click Apply.
-
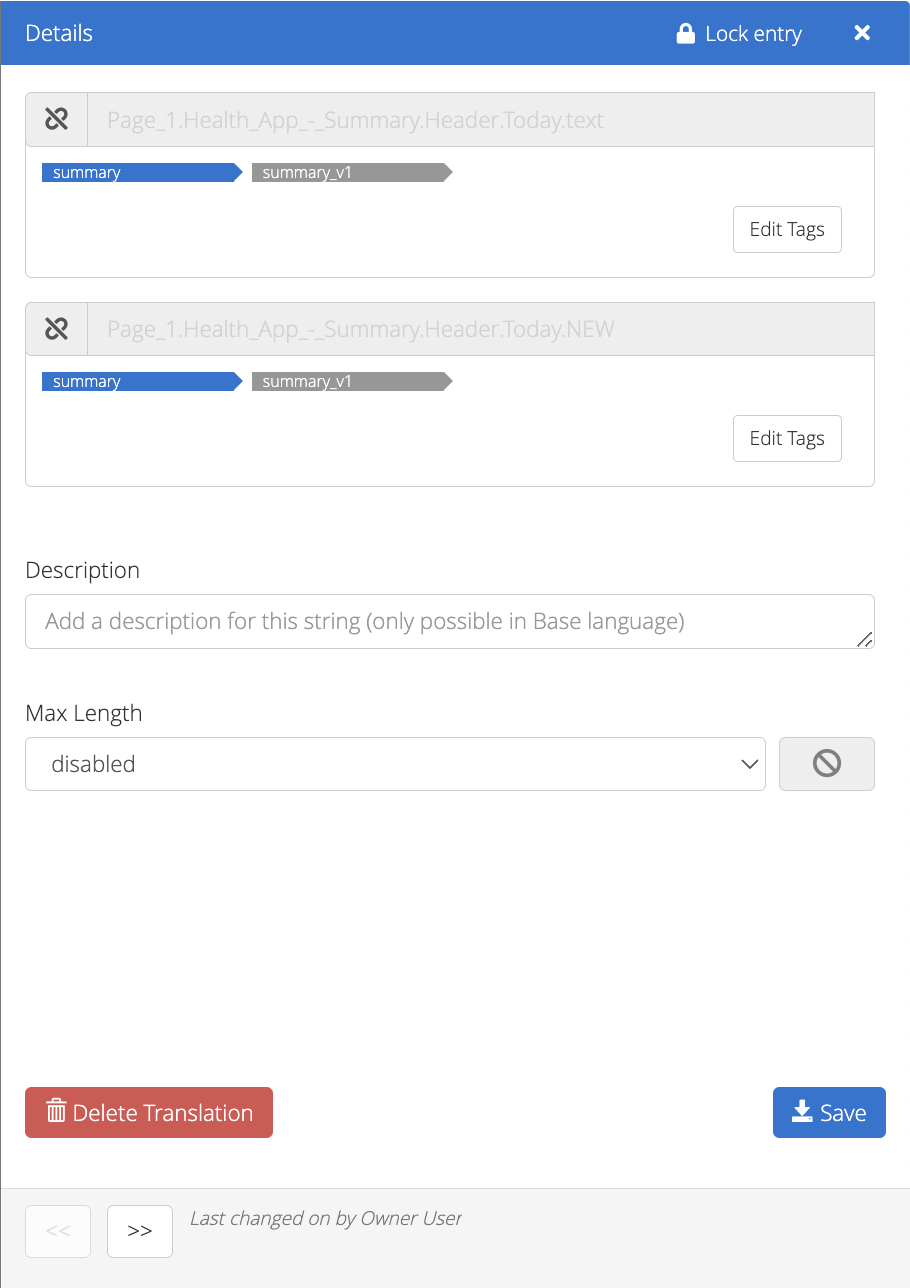
In the Details view
- Hover over the string and click the information icon.
- In the Details view, inside the ID field, click Edit Tags.
- To apply an existing tag:
- Type the tag name into the text field or scroll to search.
- Mark the tag's checkbox.
- To create a new tag:
- Type the new tag name into the text field.
Optional: Click the arrow button above "No tags found" to apply a category to a tag.
- Click Create.
- Click Apply.
- Click Save and close the Details view.
-
In the tags list
- Click the Tags button in the side-bar menu to open the Tags list
- Click + Add Tag.
- Add the tag name and click Create.
- Mark the string(s) which needs tagging via the checkbox.
- Click the Tag dropdown on the top menu.
- Type the newly created tag name into the text field or scroll to search.
- Mark the tag's checkbox.
- Click Apply.
Back to Top
-
In the Editor
- Mark the checkbox(es) for the string(s) which no longer needs the tag.
- Click the Tag dropdown on the top menu.
- Search for the tag name.
- Click on the checkbox for the given tag to remove the checkmark.
- Click Apply.
-
In the Details view
- Hover over the string and click the information icon.
- In the Details view, inside the ID field, click Edit Tags.
- Search for the tag name.
- Click on the checkbox for the given tag to remove the checkmark.
- Click Apply.
- Click Save and close the Details view.
Back to Top
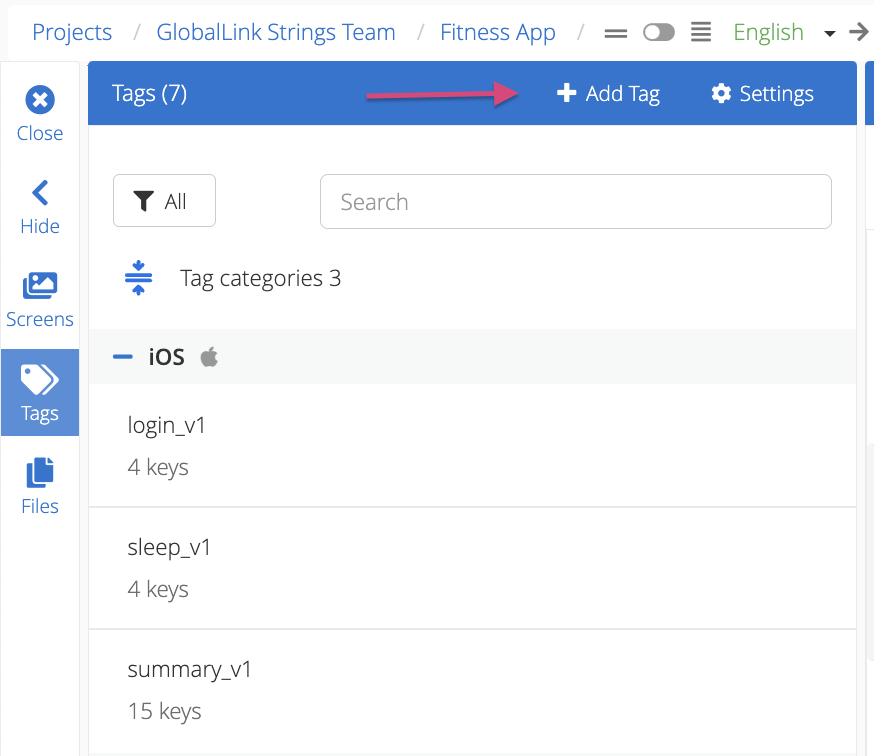
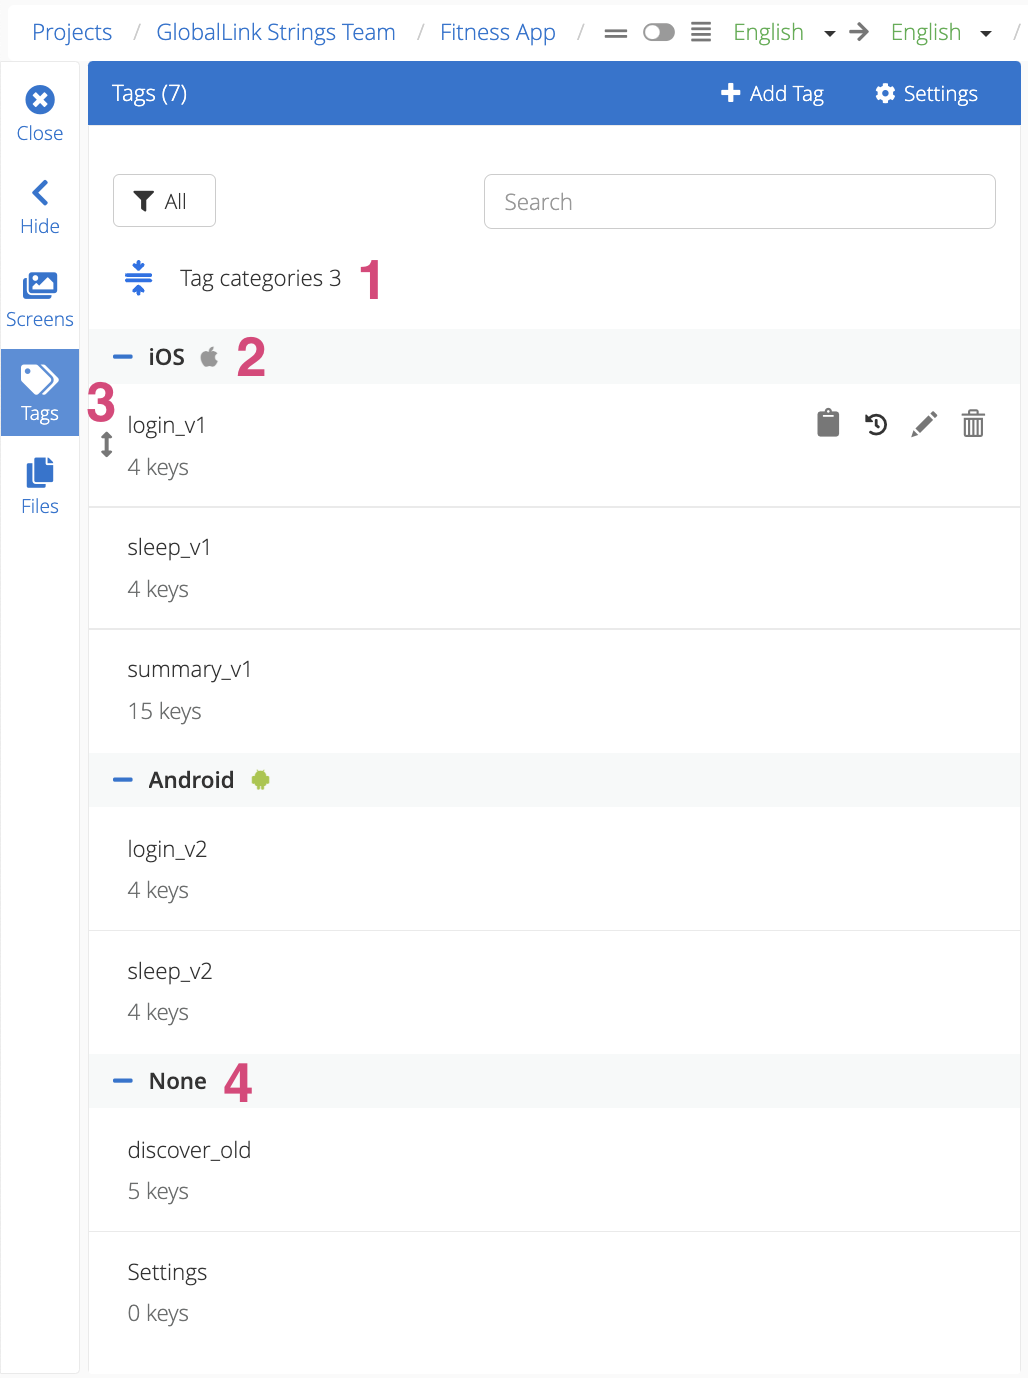
The Tags list shows all the tags in a project. From the Tags list, users can create, edit or delete tags, view a tag's change log, or group them under tag categories.
- Click the Tags button on the side-menu to open the Tags list.
- Use the search bar to look up a specific tag (2).
- Click the copy to clipboard icon to copy the tag name (3).
- Click the change log icon to view the tag's change log (4).
- Click the pencil icon to edit an existing tag name or assign a tag category to it (5).
- Click the trash can icon to delete a tag (6).
- Drag and drop tags via the arrow icon to reorder tags or to move them into a different category (7). Note: Tags can only be reordered when the list is sorted by "Custom".
- Click + Add Tag to create a new tag (8).
- Click Settings to filter for tags with or without associated screens OR change the sort and display order of tags (9).
- Click the filter icon to filter by tag category (10).
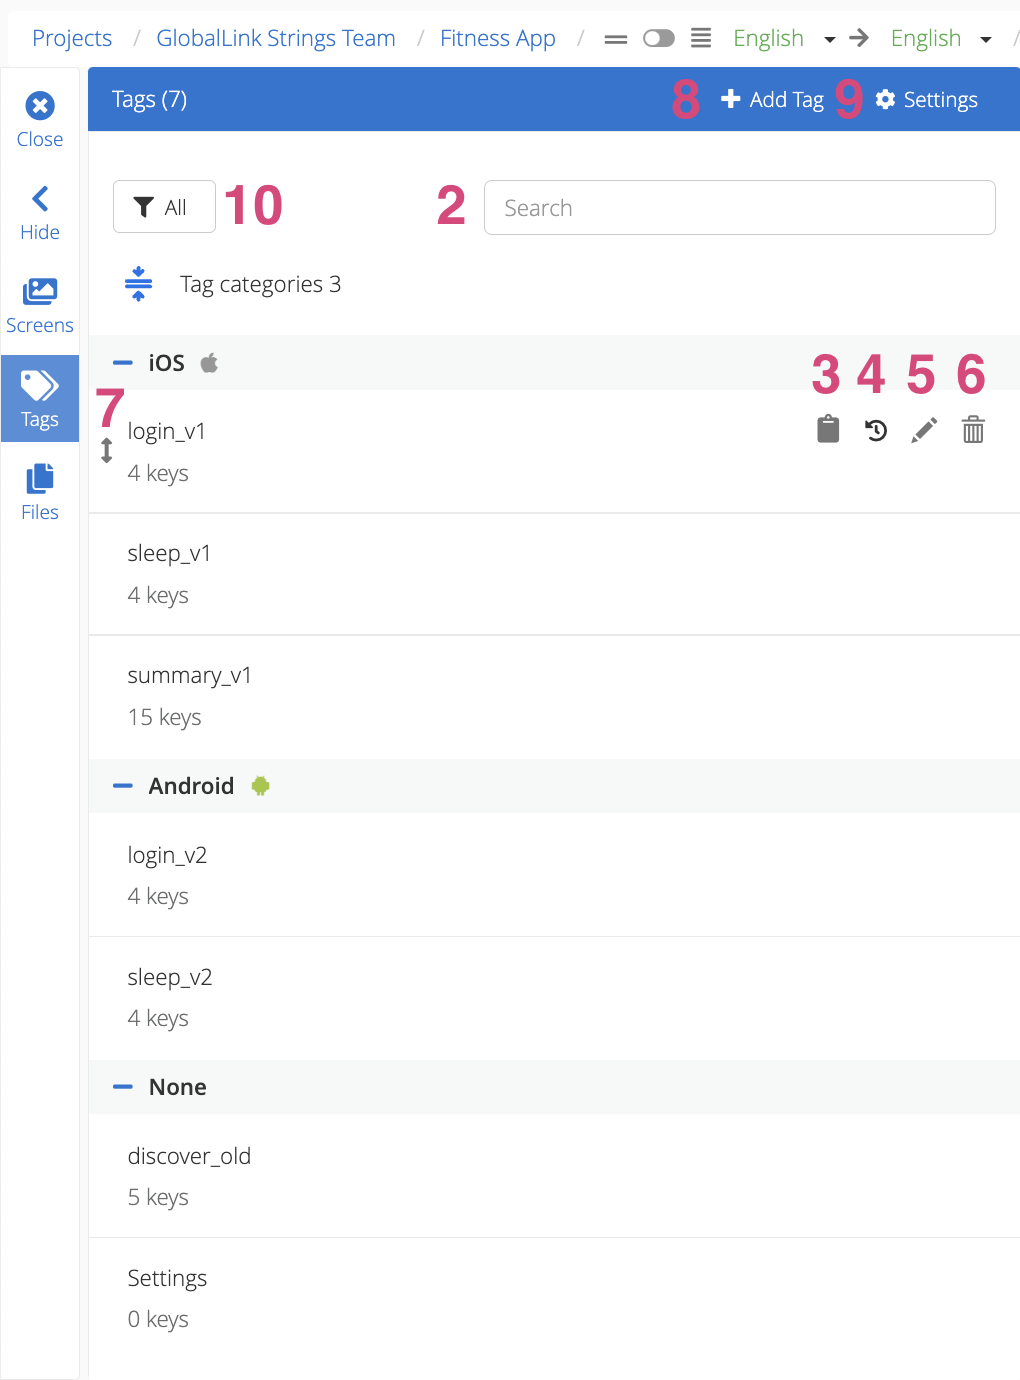
If you're using tag categories, the tags on your list will be grouped under the relevant category.
- Click on the Expand/Collapse icon to expand or collapse all the tag categories on your list (1).
- Click on a tag category to expand or collapse a specific tag category (2).
- Drag and drop tags via the arrow icon to reorder tags or to move them into a different category (3). Note: Tags can only be reordered when the list is sorted by "Custom".
- The tags that do not belong to a category will be grouped under None (4).
Back to Top
Tag Considerations
-
Tags can be used to limit the scope of translation orders.
-
Screenshots and tags
- All uploaded screenshots and the corresponding strings can be tagged to help users track which strings display on which screens.
-
Mixed state of tags
- If the selection of strings contains some tagged and some untagged strings, the Tag dropdown can be used to add tags to all strings or remove tags for all strings.
- Click the Tag dropdown on the top menu.
- Search for the tag to add or remove.
- Mark the checkbox next to the tag to tag all strings or click again to remove the tag from all strings.
-
Managing tags in linked strings
- Users can create, add or remove tags from individual strings inside linked entries. Tags in linked entries can be managed via the Details view.
-
Character limit of tags
- Tags have a maximum limit of 400 characters.
-
API Integration - see API Integration Documentation
- Tags can be used as a request parameter to:
- Request by tag
- Create a new tag
- Upload and tag strings
- Mass upload screenshots
-
CLI Integration - see CLI Integration Documentation
- Tags allow users to upload and download only a subset of all available strings into or from certain files.
- The GL Strings GitHub Workflows integration uses the GL Strings CLI internally, so all tags available via the CLI are also available in GitHub Workflows.
Back to Top


